Showing posts with label island batik ambassador. Show all posts

November 12, 2019

Island Batik November 2019 {Blog Hop!}

The products featured in this post were given to me by Island Batik and Hobbs.


Welcome! Today is my turn on the Island Batik Ambassador "A Piece Of" blog hop! All of the Island Batik Ambassadors received surprise bundles of fabric in our January 2019 boxes, but we weren't allowed to use the secret fabrics until it was time to make our blog hop projects. (You can check out my unboxing video on YouTube where I accidentally revealed the name of my secret fabric collection and learned a LOT about video editing to clip it out!) My surprise collection is Mermaid Cove, and it is full of amazing colors and prints.


My initial plan was to make my blog hop project while joining in the 2019 Free Wheeling Single Girl Sewalong. (This quilt pattern by Denyse Schmidt has been on my quilty to-make list for a long time.) I bought the pattern and the templates. I started chopping up fabric, piecing scrappy arcs and sewing some curves. The bright Mermaid Cove fabrics looked awesome paired with the black Island Batik solid...but the fabrics that were supposed to be the focus of my project was so chopped up you couldn't really see how awesome they are.


With the large scale of some of the prints, I decided some BIG quilt blocks were in order, and Jemima Flendt's "Quilt BIG" book was the perfect source. (I seriously love every pattern in here and want to make all of them. Maybe a goal for 2020?)


I had seen a few different versions of the Lozenge Quilt on Instagram. As a bonus, I had the AccuQuilt Companion Set - Angles to make two sizes of the blocks...always a huge time saver!


The largest size block in the quilt pattern is perfect for showcasing the large-scale prints.


Here are some of the medium-sized blocks in more pretty fabrics.


The finished quilt top is gorgeous, but you'll have to take my word for it. I live in Nebraska. It was 72 degrees and beautiful on Saturday. I finished piecing my quilt top on Sunday when it topped out at 52 degrees. My plan to take pics on Monday morning before work was foiled by snow, frigid temperatures (21 degrees) and a howling wind. My sweet husband and son agreed to take pictures Monday afternoon since it would be dark by the time I got home from work. Without further ado...


Apparently the wind was worse than it had been in the morning. This quilt top is next in line for the longarm to be quilted with black Hobbs Heirloom Premium 80/20 Cotton Blend batting. I promise to share pictures of the completed quilt soon.

a precut bundle of the Island Batik Sand Bar collection, designed for Kari Nichols of Mountainpeek Creations by Kathy Engle. (The Rafflecopter giveaway is at the bottom of the post.

In addition, I'll be cutting some of my Mermaid Cove scraps into a charm pack using my AccuQuilt GO! (This fabric collection doesn't hit quilt shops until December, so you can be one of the first quilters to create with it!) To enter, just leave a comment on this post. Since I'm already in the Christmas spirit, I would love for you to leave a comment with your favorite Christmas/holiday movie. I'm compiling a list to keep me entertained from now until Christmas! (For the record, my favorite holiday move is "Love, Actually".)

**Edited to Add: My giveaway will be open until 9pm CST on Sunday, November 24. Since I didn't originally specify, I will open it worldwide.**

Thanks for stopping by! Happy sewing!


November 3, 2019

Island Batik October 2019 {Top it Off}

The products featured in this post were given to me by Island Batik and Hobbs.


My October Island Batik Ambassador project was to make a applique holiday-themed table topper or table runner. I'm a few days late because I had a bit of trouble coming up with a project idea. My kitchen table is usually too cluttered to properly display a table topper or table runner. I don't do a lot of holiday decorating because I'm not a fan of undecorating and storing said decorations. While I do enjoy applique every once in awhile, it's definitely not one of my favorite techniques. All that being said, one of my favorite aspects of the Island Batik Ambassador Program is being challenged and having the opportunity to try things I normally wouldn't try on my own.

Now back to my project...I was at Dollar Tree and had a light bulb moment of gluing my beautiful Island Batik scraps to a felt snowflake I found. It would be scrappy! And fabulous! It was genius! And how often can you make a project using scraps you find on your sewing room floor?


After the glue dried, my plan was to trim the fabric even with the edges of the felt snowflake. That didn't work AT ALL, and this project ended up in the trash. 


I'm sharing this because it's totally ok to have an idea, give it go, and not have it work out. This version of my idea didn't work, but I'll be trying it again using a different method.

At this point, I was still in need of a project so I went back to the drawing board. I decided I would prefer to make a project that could work for multiple holidays and used my go-to applique scrappy bunting technique on Island Batik white solid fabric. I don't always applique, but when I do, it's raw-edge applique.


I appliqued "celebrate" to it, and it's the perfect table topper for birthdays or any other day with something special to celebrate!


I'll probably go back and add some more quilting, and I think it needs a binding...even though that means making bias binding. I used Hobbs polyester batting which is nice and lofty so some more quilting would definitely pop.

Thanks for stopping by! What do you have to celebrate today?

July 31, 2019

Island Batik July 2019 {Artsy Fartsy}

For our July Island Batik Ambassador projects, we were invited to get fancy with the Aurifil Artsy Fartsy Challenge! Using fabric as our canvas and Aurifil thread as our paint, we were challenged to create a one-of-a-kind art quilt or project with Aurifil thread.


I've been wanting to upcycle a favorite pair or jeans for awhile, and the July challenge presented the perfect opportunity. I've also wanted to try my hand at some visible mending. (Check out the #visiblemending hashtag on Instagram if you're unfamiliar with the fun new trend.)

Summer is always so busy, and this summer has somehow been even busier than usual for me. I knew I was going to spend parts of our Minnesota fishing vacation working on and blogging about my project. Before we left, I cut off the legs of the denim jeans to create fabric panels by using some of my pretty Island Batik Ditty fabric scraps to join the pieces of denim.


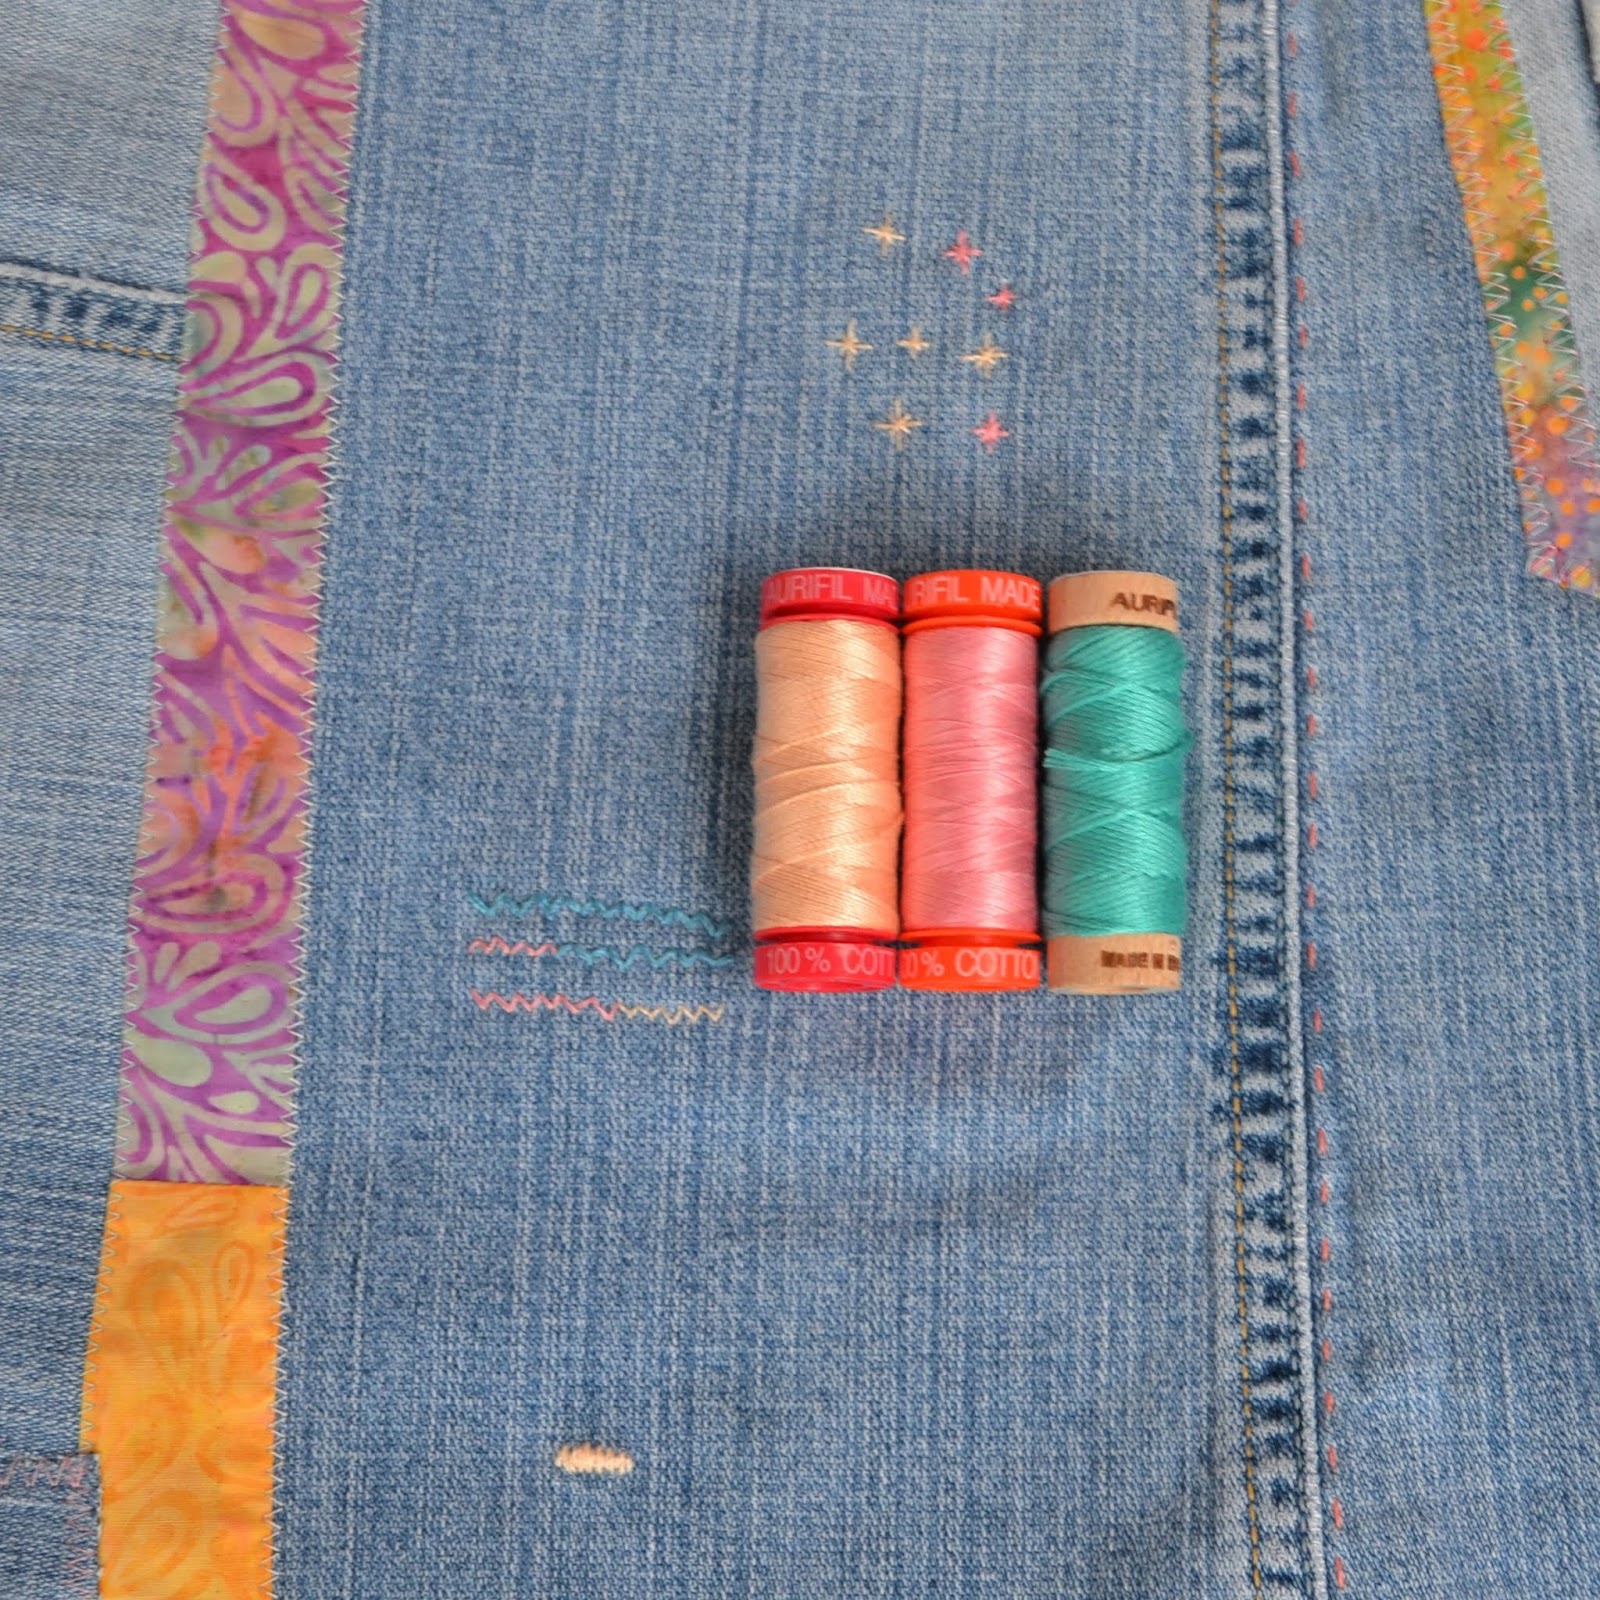
I had several Aurifil threads and flosses that coordinated with my fabrics and used them to embellish the fabric panels with various types of machine and hand stitching. I used this handy Aurifil info card to determine what each type of thread and floss was best suited for.


I used white Aurifil Cotton 50WT (those are the threads with the familiar orange spools) for all the piecing and construction of the fabric panels.


I also had Cotton 50WT spools in a pretty pink and two blues, so I added some decorative zigzag stitching.

I used three strands of two different colors of Aurifil cotton floss to patch up the frayed area on the pocket and add some big stitching.


I added various decorative stitching using a double strand of Aurifil Cotton 12WT (cream thread), a quadruple strand of Aurifil Cotton 50WT (peach thread), and three strands of Aurifil Cotton Floss (aqua floss).

There was a hole in what used to be the knee of the jeans, so I tried my hand at visible mending. I used a couple different colors of Aurifil Cotton 50WT thread to stitch a piece of fabric behind the hole and used three strands of Aurifil Cotton Floss to add a decorative stitch around the area. 


My plan is to use my embellished fabric panels to make a tote bag. I had a lot of fun experimenting with the different types of Aurifil threads and flosses, and it was relaxing to sit and do some hand stitching. I'll be sure to post my completed bag here on my blog and on my Instagram page when it's done. Thanks for stopping by!

May 28, 2019

Island Batik May 2019 {Make it Modern with Hobbs}

The products featured in this post were given to me by Island BatikHobbs, and AccuQuilt.

May brings the second Island Batik industry partner spotlight event for 2019. This month, Island Batik Ambassadors are having fun creating modern quilts using Hobbs quilt batting!


As a modern quilter, modern quilt challenge are my favorite. Our assignment was to make a crib size or larger quilt that incorporates one of the characteristics of modern quilts as defined by the Modern Quilt Guild.

  • the use of bold colors and prints
  • high contrast and graphic areas of solid color
  • improvisational piecing
  • minimalism
  • expansive negative space
  • alternate grid work
One of the workshops I teach is a modernized log cabin, and I decided to use my remaining Ditty fabric (from this quilt) to make one of these log cabin quilts. I cut 2.5" strips using my AccuQuilt Ready, Set, Go! which comes with the 2.5" strip cutter.


One of my favorite ways to "modernize" a quilt is to make half the quilt negative space and the other half focus fabrics. The blocks in my quilt are just regular old log cabin blocks, but I randomly chose pieces to create alternate grid work and give it an improvisational look. Another aspect of modern quilts is modern traditionalism, and this is my modern spin on a log cabin quilt.


The quilting pantograph I used was Froth and Bubble from Urban Elementz. It is probably one of the least modern patterns I have, but I thought it would look pretty with the pastel colors and it echoed the print in some of the fabrics. I used Hobbs Heirloom Premium 80/20 Cotton/Poly batting. It gives it so much texture, and the quilt hasn't even been washed yet!


I pieced the back using some coordinating Island Batik fabrics in my stash. My crib-size quilt is about 35" x 46" so I was able to use the width of the fabric and just had to piece some strips. (Bonus!)


Obligatory front porch photos...


Thanks for stopping by! I'll be back soon with my June Island Batik project. (It's doing double duty with the Omaha Modern Quilt Guild challenge, so it *must* be done by June 4.) Happy sewing!

April 29, 2019

Island Batik April 2019 {AccuQuilt Ready. Set. GO!}

The products featured in this post were given to me by Island BatikHobbs, AccuQuilt, and Aurifil.


April brought the first Island Batik industry partner spotlight challenge! This year, AccuQuilt generously provided all the Island Batik Ambassadors with the amazing Ready. Set. GO! Ultimate Fabric Cutting System. This starter set includes:


  • GO! Fabric Cutter
  • GO! Qube 8" Mix & Match Block
  • GO! Strip Cutter-2 1/2" (2" Finished)
  • GO! Cutting Mats: 6" x 6" and 10" x 24"
  • GO! Qube Book by Eleanor Burns
  • Die Pick
  • Over 70 free patterns!
For those that follow me on Instagram, you know that I love my AccuQuilt! This system allows me to quickly and accurately cut my fabric so I can spend more time designing and sewing. I enjoy creating with the AccuQuilt Qubes because I can randomly cut and sew my pieces, and I know they're going to work together. (Seriously...quilt math is not my forte!) For the April project, Ambassadors were asked to use AccuQuilt dies to make a baby quilt that is 40" to 48" square. 

AccuQuilt has a free download of 72 block patterns you can make with the Qubes. I couldn't decide on a block, so I looked through some of my Pinterest pins for ideas. (In addition to using my fabric stash, I'm also trying to make some of the many ideas I have pinned over the years.) I was drawn to a HST Block of the Month from February 2012 by Jeni Baker of In Color Order. I decided to use that block for my quilt but make flying geese instead of half-square triangles. I used die 3 (GO! Half Square Triangle-4" Finished Square) for the main part of the flying geese and die 5 (GO! Quarter Square Triangle-4" Finished Square) for the corners. I used a stash builder (roll of 5" strips) of bright fabrics in greens, purples and aquas and added in some Check It Out Hot Pink.


By cutting up to 6 layers at a time, the AccuQuilt really decreases the amount of time spent cutting. Having all the pieces cut and ready to go makes for some quick chain piecing. 


Before you know it, you're on your way to having a completed quilt top! I cut and pieced my quilt in my new studio, Happy Little Stitches. I've never really had room for a design wall at home, so it is wonderful having space to layout (and leave!) projects.


I quilted this on my APQS Lucey with the Papyrus pantograph from Urban Elementz. I just bought a 30-yard roll of Hobbs 80/20 Cotton/Poly batting, and I love how it quilts up. (There's going to be some amazing crinkle texture after this is washed!) I finished the binding with some hand stitching using 3 strands of Aurifil cotton floss (1148 Light Jade).


The completed quilt! Even though I used the 8-inch Qube, my blocks ended up about 11 inches because I used the half-square triangle die on point. The completed quilt is approximately 42 inches square. 


Thanks for stopping by! 

February 26, 2019

My Magnificent Mini

The products featured in this post were given to me by Island Batik, Hobbs, and AccuQuilt.

Welcome! The Island Batik Ambassador assignment for February is to make Magnificent Minis. Our mini quilts must be 24” x 24” or smaller using any technique and any Island Batik fabrics except our “surprise” fabrics. (You won't get to see those until August!) The timing for this challenge was perfect because I participated in the Modern Quilt Guild mini quilt swap and needed to have my swap mini quilt finished before leaving for QuiltCon last Wednesday, February 20. (Now I may have been handing stitching the binding on the flight to Nashville, but it was done by the time I got there!)

For the Modern Quilt Guild (MQG) mini swap, we are paired up with another MQG member and made mini quilts for one another. If you check out the hashtag #makeaminimakeafriend on Instagram, you can see some of the amazing mini quilts made and swapped either in person at QuiltCon or through the mail. My swap partner, Donna, lives in Maine and is a member of the Mt. Battie Modern Quilt Guild. She loves the coasts and forests of Maine, and I decided to make a beach-themed mini quilt for her. 


I used my AccuQuilt Go! and the 2" finished half square triangle die (#55712, die 5 in the 8-inch Qube) to make a scrappy half square triangle heart using various turquoise and aqua Island Batik fabrics. For the background, I used a combination of 4" HSTs and quarter square triangles (QSTs). I randomly pieced bright fabric scraps on some of the corners of the HSTs and QSTs to resemble beach glass in the sand.


The quilting is simple straight-line quilting on my domestic sewing machine (Bernina Activa 230) using a walking foot and a HandiGadgets HQ Straight Edge Ruler. This was my first time doing any kind of ruler work, and I am pretty pleased with the results. I think the angular quilting mimics the broken glass theme in the piecing. Hobbs is a sponsor of the IB Ambassador program, and I used the Hobbs Heirloom 80/20 Bleached Cotton Blend.


This was my first time attending QuiltCon, and my partner and I were able to swap mini quilts in person.


I love the mini quilt Donna made me. You can tell when someone really takes your likes and dislikes into consideration when making you something. My mini has all of my favorites...Grunge, text, bright colors, improv, and half square triangles. QuiltCon and this mini swap were both such wonderful experiences. I can't wait until the next QuiltCon in February 2020. See you in Austin!


January 8, 2019

Island Batik Getaway Blog Hop!

The products featured in this post were given to me by Island Batik.


Welcome to my stop on the Island Batik Ambassadors Getaway Blog Hop! We're on day 2 of our travels, and I'm so happy you're making a stop at my blog. As Island Batik Ambassadors, we get two huge boxes filled with gorgeous Island Batik fabrics, Hobbs batting, and Aurifil thread. There's always a package of beautifully-wrapped fabric marked "SURPRISE!" that is *not* to be revealed until the specified release date. (And it's always sooo hard to keep a secret when pretty fabric is involved!) I was absolutely thrilled when I opened my package to find the "Ditty" fabric line.


One of my favorite things to do with pretty, coordinating fabrics is to cut it up using my AccuQuilt Go! and randomly sew the pieces back together. I decided to sew some curves and used the AccuQuilt Drunkards Path die (#55740, dies 11 & 12) from the Go! Qube Mix & Match 12" Companion Set. I cut 42 pieces each of the inner and outer curves and was able to quickly cut the pieces needed for a baby quilt.


When sewing my blocks together, I randomly paired up fabrics. I decided not to assemble my blocks into a traditional Drunkard's Path but instead oriented each 6-inch block the same way.


This quick and easy quilt is a perfect little baby quilt. It measures 36" x 42". (I sometimes wonder if this is too small for a baby quilt since kiddos grow so fast, but I think it's the perfect size for dragging around for many years.)


I quilted this on my AQPS Lucey using the Gatsby pantograph from Urban Elementz. I quilted it so the curves in the panto went the opposite direction from the curves in the pieceing, and I think it adds some interest to the quilt.


The backing is Island Batik Batter, and I used my AccuQuilt Go! to cut 2.5 inch binding strips for a scrappy binding.


This happy little quilt is a baby gift for a former pharmacy student of mine. She just had a baby girl in December, and I'm sure it will be well-loved.

This is only day 2 of the Island Batik Getaway Blog Hop, and there's a full itinerary on the Island Batik website! Be sure to check out all the Island Batik Ambassador blog posts for great giveaways. Island Batik is also giving away a rainbow of 20 fat quarters of Island Batik Basics.

To celebrate our Island Batik Getaway, I'm giving away a 5-inch charm pack (42 squares) of the Ditty fabric line cut with my AccuQuilt Go! To enter, just leave a comment below telling me your favorite go-to baby quilt pattern (if you have a link to a pattern, even better!) or what you would make with the Ditty charm pack. If you are a no-reply blogger, please leave an email address so I can contact you if you win. My giveaway is open for one week, and I'll draw a winner at approximately 9pm CST on Tuesday, January 15. Thanks for stopping by and good luck!

EDITED TO ADD: My giveaway will remain open through Sunday, February 3 and I will select *two* random winners to each receive a Ditty charm pack. The two random winners will be contacted by Tuesday, February 5.