


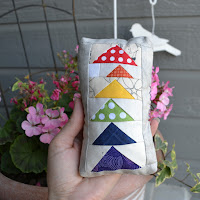
For each improv flying geese unit, you will need one scrap triangle and one square of fabric. For a rainbow pincushion, you will need 7 triangle scraps (red, orange, yellow, green, blue and purple) and 7 background squares.

Cut the squares in half diagonally.

To make a flying geese unit, select 2 background triangles (from the squares you cut in half) and one focus triangle.

Using a 1/4" seam, sew one side of the focus triangle to one of the background triangles. Center the focus triangle on the background triangle. (It doesn't have to be centered perfectly.)

Fold the focus triangle back and press.

Sew the other background triangle to the focus triangle.Open and press. Your first improv flying geese unit is complete!

Trim the top and bottom of the flying geese block. Trim the bottom of the block even with the bottom of the triangle. Trim the top leaving at least 1/4" seam allowance above the top point.

Repeat the above steps to make the remaining flying geese units. (It goes much faster when you chain piece!) If some of your flying geese are narrower than the others, you can add a scrap of background fabric to one of both sides.(My orange block was pretty narrow, so I added a small scrap to one side.)

Sew your flying geese units together.

Trim the sides leaving at least 1/4" seam allowance about the side points. (Your trimmed piece may not be squared up, and that's ok!) Layer your flying geese block on a larger piece of batting. Cut 2 background strips (between 1-1/2" and 2" wide will work) the length of your flying geese block strips. You'll also need 2 strips for the top and bottom of your block. (Wait to cut these until you have the side strips sewn on and know what length you'll need.)

Place one strip face down on one side of your flying geese block. Sew with a 1/4" seam then press strip back away from the block. Repeat on other side, top, and bottom of block.

"Square up" your block. Mine ended up measuring 7" x 4-1/2".

Cut a piece of fabric (the same size as your pincushion top) for the back of your pincushion. If you like, you can add a piece of interfacing your the wrong side of your pincushion backing. I like to use SF101.

Place your pincushion backing on your pincushion top with right sides together. Using a 1/4" seam allowance, sew together leaving an opening on one long side for turning.

Before turning, I added boxed corners to the pincushion. Pinch the corners together and sew a seam 1/4" away from the corner.


- Turn the pincushion right side out.

- Stuff pincushion with desired filling (polyfil, batting or fabric scraps, crushed walnut shells, etc). For this one, I used crushed walnut shells. Since it can be a little messy, I make a funnel to pour the crushed shells into.

Fill to desired fullness then stitch up the opening. You are done!


No comments:
Post a Comment